Investigate the Relationship Between Force and Acceleration
Experimental Set Up
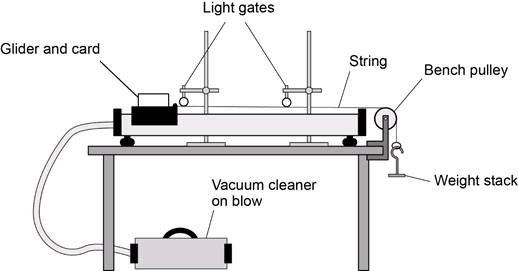
Method
You are provided with the following:
- Linear air track and gliders
- Vacuum cleaner
- Bench pulley, string and small weight stack eg 1 N in steps of 0.2 N
- Card
- Two clamp stands, with clamps and bosses
- Two light gates, interface and computer
- Adhesive putty to attach the weights to the glider
Read these instructions carefully before you start work.
-
Place the air track on a bench and attach it to the vacuum cleaner, set on ‘blow’.
-
Place a glider on the air track and switch on the vacuum cleaner. The glider should lift up off the air track and be free to move.
-
Adjust the legs of the air track so that the glider moves without touching and the air track is horizontal.There are two separate adjustments to make. With the vacuum cleaner on:
a. Place the glider above the adjuster that tilts the air track from side to side. Adjust the length of the leg until the glider does not touch the sides b. Place the glider in the middle of the air track. Adjust the other leg until the glider does not move when released. -
Cut out a piece of card measuring 5 cm 10 cm. Put it in the groove on the glider. The long side should be horizontal.
-
Clamp the two light gates horizontally. Position them above the air track so that the card passes through them as the glider moves.
-
Connect the light gates to the interface and computer. Start the software for timing. You should have the opportunity to choose acceleration using two light gates.
Type in the length of the card (10 cm) when asked by the computer.
-
Check the movement of the glider by gently pushing it along the track. The software needs to be on.The acceleration should be close to zero. Switch off the vacuum cleaner.
-
Attach the bench pulley to the end of the air track away from the vacuum cleaner.
-
Tie a length of string to the glider. Pass the string over the pulley and attach the weight stack to the other end of the string.
Make sure the string is horizontal and is in line with the air track.
-
Switch on the vacuum cleaner. The glider should accelerate through the light gates as the weight falls to the ground.
-
If necessary, move the second light gate so that the glider passes through it before the weight hits the ground. If the weight hits the ground too early, the glider will stop accelerating too early.
-
The first experiment will investigate how the acceleration depends upon the force. The force is provided by the weight stack.
- Attach the full weight stack (1 N) to the end of the string.
- Switch on the software.
- Make sure the glider is in position and switch on the vacuum cleaner.
- The glider should accelerate through the light gates towards the bench pulley.
- Record the acceleration. Repeat.
- If the two values are not similar, repeat again.
- Record your readings in a table such as the one below. Calculate the mean.
Force in N, Acceleration in cm/s2
First reading, Second reading, Third reading, (if necessary) Mean
-
Remove one weight (0.2 N) and attach that to the glider. This will keep the total mass constant. (The weight stack is being accelerated too.)
-
Repeat the experiment for a force of:
- 0.8 N
- 0.6 N
- 0.4 N
- 0.2 N
Remember to attach each weight to the glider as it is removed from the weight stack.
-
Plot a graph with:
- ‘Acceleration in m/s2’ on the y-axis
- ‘Force in N’ on the x-axis.