Separating Techniques
Paper Chromatography
You will need to know:
What paper chromatography is.
What equipment is involved in this.
What is paper chromatography?
Chromatography is one way in which we can determine what there is in a mixture of liquid (such as ink). You may have seen paper chromatography being done in your classroom to separate different dyes in ink.
Equipment
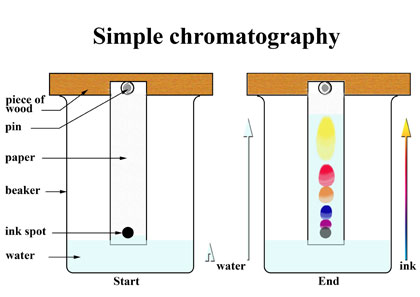
This is how the experiment is set up.
It includes:
- A beaker
- Water
- Pencil
- Ink (which you wish to seperate)
- Filter Paper
- Piece of wood and a pin (or anything to keep the paper from falling into the water!)
Paper Chromatography Experiment
You will need to know:
How to carry out paper chromatography.
How to analyse the results of paper chromatography
How to carry out the experiment:
- Draw a straight, horizontal pencil line about 1cm from the bottom of the filter paper (we use pencil since it does not dissolve in water).
- Draw a spot of ink on the pencil line.
- Secure the filter paper so that the bottom is in the water, making sure that the water doesn’t touch the ink spot.
- You will see the water soak up the paper and drag the ink with it.
- Before the water soaks to the very top of the paper, take the paper out and draw a pencil line at the point the water has reached.
If you are separating two different kinds of ink, you should see something that looks like this:
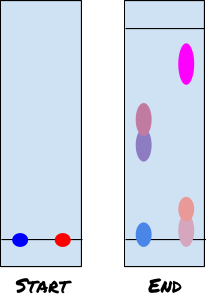
NOTE: The highest point the water reaches is called the solvent front.
NOTE: Lots of different solvents can be used instead of water, it really depends on the type of ink you are using.
Interpreting Chromatograms
On most chromatograms, the number of spots at the end of the experiment usually shows how many dyes were in the ink dot. Although, sometimes there may be more than one type of dye in a spot. So remember, there are at least as many substances in a mixture as there are spots on the chromatogram.
Evaporation and Crystallisation
You will need to know:
What evaporation is and how it is used to separate substances.
What filtration is and how it is used to separate substances
How to separate soluble and insoluble solids from a liquid.
How to form crystals when separating a soluble solid from a liquid
Here is how to separate soluble and insoluble solids from a liquid:
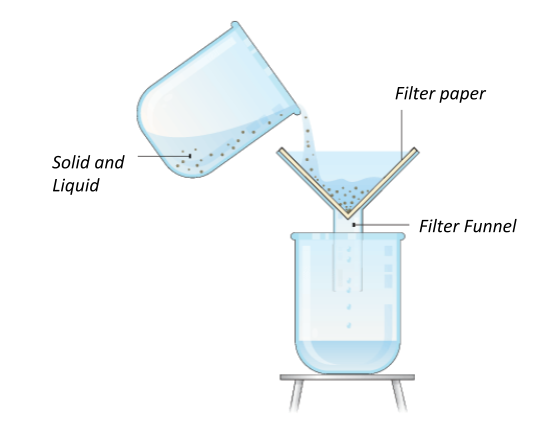
Filtration:
Separating insoluble solids from a liquid.
This simply done by using filter paper, a filter funnel and a beaker (to catch the liquid)! Here is an example of how the equipment would look…
Evaporation:
Separating soluble solids from a liquid. Evaporation is when you heat a liquid up enough that it turns into a gas.
Here is an example of separating salt from salt water…
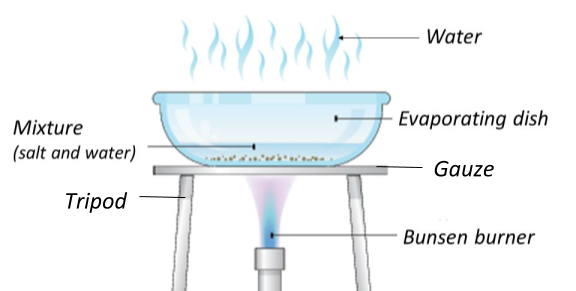
Here is how to evaporate a solid from a liquid:
- Set up the equipment on top of a heat proof mat, as seen above.
- Turn the bunsen burner onto a blue flame.
- Wait until all of the liquid has evaporated and there is only solid left. Make sure you don’t let the liquid get hot enough to spit, this would hurt if it got you!
Crystallisation
- Separating What evaporation is and how it is used to separate substances.
- What filtration is and how it is used to separate substances
- How to separate soluble and insoluble solids from a liquid.
- How to form crystals when separating a soluble solid from a liquid
- s from a liquid and making lovely crystals! Crystallisation is much slower than evaporation, but the technique is very similar.
__Here is how to crystallise soluble solids from a liquid: __
- Set up the equipment on top of a heat proof mat, as seen above.
- Slowly heat the solution on a low flame.
- Once some of the solvent has evaporated, or when you see crystals starting to form, carefully move the bunsen burner from the evaporating dish.
- Allow the dish to cool.
- You should see more crystals gradually forming as the liquid cools.
- Once it is completely cool, filter the crystals out of the solution.
- Allow the crystals to dry in a warm place.
Distillation
You will need to know:
What distillation is and how it works in the lab.
What condensation is.
How a condenser works and how to draw/label one.
Separating liquids from other liquids
Distillation may look very complicated at first, but it is just three simple concepts combined.
Here are the three concepts you’ll need to understand before understanding distillation:
- Evaporation: heating a liquid until it fully turns into a gas.
- Condensation: cooling a gas until it turns into a liquid.
- Boiling point: liquids boil at a certain temperature, meaning all liquid particles start to change into gas particles. Different types of liquids have different boiling points.
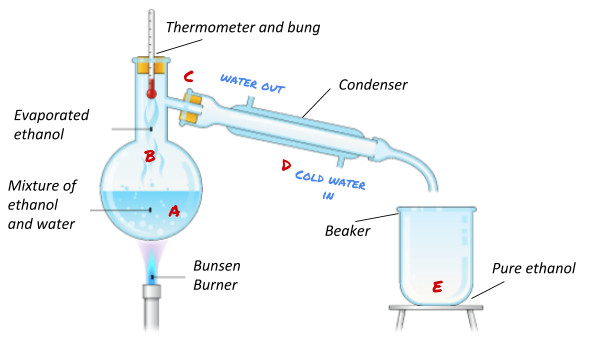
Here is how distillation works, step by step:
- A mixture of two liquids is heated up to the lowest of the two boiling points.
- One of the liquids evaporates into a gas.
- The gas drifts into the condenser, where it is cooled.
- The gas turns back into a liquid (condenses) and drips down into the beaker on the other side.
- If the temperature doesn’t reach the second boiling point, the two liquids will be separated between the two beakers.
Condenser
Here is a closer look at the condenser.
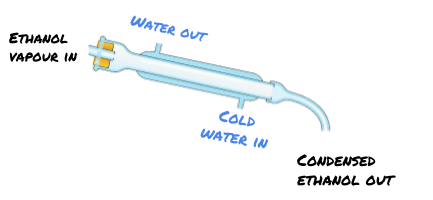
The condenser is made out of a glass tube surrounded by another glass tube. The outer tube has cold water running through it. This outer tube cools the inner tube, allowing the vapour in the inner tube to cool into a liquid. Cold water enters the bottom since the warm vapour will slightly heat up the cool water. There needs to be a temperature gradient in order to efficiently cool down the vapour.